

Tenovi Blood Pressure Monitor
Need help with your Tenovi Blood Pressure Monitor (BPM)? Find everything you need to know from set up to measurement best practices and troubleshooting. We’ve got you covered.
Jump To SectionHow It Works

Top Tips for Successful Measurement
BPM Power
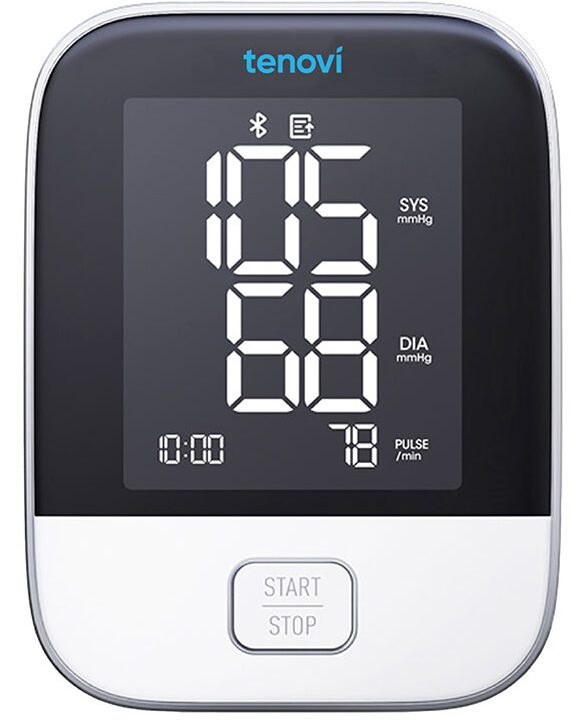
Do not turn off the monitor after the measurement is displayed. After the device has transmitted your measurement to the Tenovi Gateway, the device will turn off on it’s own. If you would like to take another measurement, wait for the screen to turn off, then click the Start/Stop button.
Cuff Size
Ensure the cuff size is appropriate for the patient.
Cuff Hose
Ensure the cuff connector/hose end-piece is inserted firmly into the monitor all the way.
Setup & Use Steps
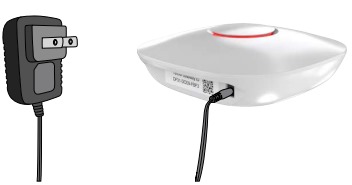
Power Gateway
Step 1: Set up your gateway by plugging it in. It will flash purple as it connects and then settle to a solid red color when it is connected.
Pull Battery Tab
Step 2. BPMs arrive with batteries pre-installed, but there is a plastic guard in the battery door that will need to be removed. Simply pull the tab and the batteries will provide power.

Put on Cuff
Step 3. Position the cuff on your upper left arm (above your elbow) directly on your skin.
Wrap the velcro of the cuff carefully so the edges of the cuff line up with one another (there should be minimal overhang).
Tighten the cuff until you can fit just one finger in-between the cuff and your arm. It is important the cuff is tightly secured so that it inflates properly.
The hose should come out the bottom of the cuff by your elbow joint. Rest your left arm on a table in front of you, palm facing upwards.

Push Start Button
Step 4. Let’s try taking a reading! Be sure the hose connector is fully inserted into the BPM device.
Put on the cuff and press the [Start/Stop] button to begin

When Taking a Measurement
Before You Measure
Blood pressure naturally goes up and down throughout the day. Changes of up to 20 mmHg are completely normal. Things like stress, caffeine, movement, talking, and even a full bladder can cause a higher reading. That’s why it’s important to follow a few simple steps to get the most accurate results.
- Sit upright in a chair with your back supported
- Keep your feet flat and legs uncrossed.
- Rest your arm on a flat surface at heart level.
- Put the cuff on bare skin, tube facing down, and not over clothing.
- Stay silent and still. Avoid distractions and moving around.
Taking Your Blood Pressure
- Measure at the same time each day if tracking over time.
- Take two readings, one minute apart, and record both.
- Average the two readings if they are different.
- Share your readings with our health care provider.
If one reading seems unusually high or low, wait a few minutes, relax, and try again. Blood pressure should be assessed based on patterns and averages over time, not a single measurement.² If you believe your measurement is high, immediately contact your healthcare provider.
Best Practices
Power Supply for your BPM
Tenovi blood pressure monitors (BPMs) are specifically designed to operate using standard AA batteries. Please note the following important guidelines:
- Do not attempt to charge or plug in a USB-C cable into the device. The USB-C port does not charge the batteries or device. The USB-C port is only for internal Tenovi debugging purposes.
If a patient is unable to obtain replacement batteries independently, they are available for direct shipment as a supply order.
Cuff Tips
- These cuffs are designed to work best on your LEFT arm with bare skin, not over clothing.
- Wrap the cuff tightly so that only 1 finger can slide in between the cuff and skin.
- Align it properly. To ensure proper placement, we recommend lightly holding the hose in between your pinky and ring finger and having the hose follow the inside of your arm. This will make sure the sensor is in the correct place.
- The cuff will inflate and you should see your reading when it is finished. Your Gateway will beep and turn green.
Choosing the BPM Cuff Size
Accurate blood pressure measurement is critically dependent on the use of an appropriately sized cuff. This section outlines the recommended procedures for selecting the correct cuff.
Gold Standard: Arm Circumference Measurement
For optimal accuracy, the gold standard method for determining cuff size involves directly measuring the patient’s arm circumference.
Procedure: Using a flexible measuring tape (or a string and ruler), measure the circumference of the patient’s upper arm. The measurement should be taken over the lower bicep, at the midpoint between the shoulder and the elbow.
Cuff Selection: Once the arm circumference is obtained, select a blood pressure cuff where the patient’s arm circumference falls within the middle range of the cuff’s indicated circumference.
Avoid selecting a cuff where the measurement is at either the very minimum or maximum edge of the cuff’s specified range, as this can compromise measurement accuracy. Optimal fit ensures the inflatable bladder properly encircles the brachial artery.
Alternative Method: BMI Estimation
In situations where direct arm circumference measurement is not an option, Body Mass Index (BMI) can serve as a reasonable estimation tool for initial cuff selection.
Application: Utilize the patient’s BMI to make an educated guess regarding the appropriate cuff size. To assist with this, refer to the BMI chart below, which also provides suggested cuff categories based on your custom ranges.
Important Consideration Regarding BMI Accuracy: It is crucial to acknowledge that BMI is calculated solely based on height and weight and does not account for body composition (i.e., the proportions of bone, muscle, and fat). These tissue types have significantly different densities. Consequently, individuals with the same BMI may have vastly different arm circumferences due to variations in muscle mass or bone structure, potentially leading to an inaccurate cuff fit and compromised blood pressure readings. Wherever possible, direct arm circumference measurement should be prioritized.
Body Mass Index (BMI) and Suggested Cuff Categories
Use this chart to find the approximate BMI based on height and weight. The colored cells and corresponding labels indicate a suggested cuff category based on the following BMI ranges:
- Small: BMI < 25
- Large: 30 BMI < 40
- XL: BMI ≥ 40
- (S) indicates a BMI < 25, suggesting a ‘Small’ cuff category.
- (L) indicates a BMI ≥ 30 and < 40, suggesting a ‘Large’ cuff category.
- (XL) indicates a BMI ≥ 40, suggesting an ‘XL’ cuff category.
Note: The ranges provided for Small, Large, and XL are custom to your request and do not align with standard clinical BMI categories (Underweight, Normal, Overweight, Obese Class I/II/III). This chart is intended solely as an estimation tool for cuff sizing based on these custom categories.
Error Codes
E1 01
The cuff is not secure or very tight.
Refasten the cuff and then measure again.
E2 02
The monitor detected motion, talking or the pulse is too poor while measuring.
Relax for a moment and then measure again.
E3 03
The measurement process does not detect the pulse signal.
Remove clothing on arm so the cuff is directly in contact with skin and measure again.
EExx
A calibration error occurred.
Retake the measurement. If the problem persists, contact your care manager or our customer service for further assistance. Refer to the warranty for contact information and return instructions.
Device Appears Frozen/Unresponsive
If the device screen looks frozen, unresponsive, or stays on for more than 5 minutes take the batteries out and put them back in.
There is not a way to reset or recalibrate the BPM. Taking the batteries out will ensure the device is off. This will not erase saved measurements.
BPM May Display “Out”
This is not an error but means measurement is too low or too high. The Tenovi BPM has the ranges:
- Systolic: 60mmHg to 230mmHg
- Diastolic: 40mmHg to 130mmHg
- Pulse: 40-199 beats/minute
For more information on the variability of blood pressure measurements, see our dedicated reference for BPM Variability.
BPM not transmitting to Gateway, no error code displayed
- Confirm that your Tenovi Gateway is plugged in and has a RED or GREEN light.
- Complete the steps under Pairing and Bonding to reconnect your device.
- Retake your measurement while keeping the BPM as close to the Gateway as possible.
- If your BPM still is not transmitting after a successful measurement, please contact Customer Support.
Device Specifics
Irregular Heartbeat Event
The Tenovi BPM V2 can also identify an Irregular Heartbeat (IHB). An IHB is flagged when the device detects a significant variation in the heart’s rhythm (the time between successive beats) during a measurement. If there are more than 2 pulse intervals with a difference of more than 25% from the mean, or there are more than 4 pulse intervals with a difference of more than 15% from the mean, this icon will be displayed at the end of your measurement:

Pairing and Bonding
The Tenovi Blood Pressure Monitor will connect automatically out of the box during the measurement. To reset this connection, with the BPM screen OFF, press and hold the start stop button until you see a small Bluetooth icon at the top of the screen and then let go. The icon will flash and the device will reconnect to the Gateway.
Storage Events
The Tenovi Blood Pressure Monitor can store up to 60 historical measurements. This means if you’re on vacation and not near the Gateway, the Tenovi Blood Pressure Monitor will save up to 60 measurements. If you take more than 60 readings while still away from the Gateway, the first measurement you took will be erased as you take new measurements. However, you are not able to cycle through previous measurements on the device itself.
Maintenance
Clean both the device and cuff with a soft, dry cloth. If necessary use a dampened cloth and natural detergent. Do not use alcohol, benzene, or other harsh chemicals.
Store the device, cuff and adapter in a clean, dry place, and protect it against extreme moisture, heat, lint, dust and direct sunlight.
Device Reissue
If this is a replacement device please visit the Tenovi Web App for further assistance.
The Tenovi Blood Pressure Monitor is compatible with Gateway firmware 1.8 and later. Using a Gateway with an earlier firmware version may cause connectivity problems.


Downloads
Sources
- Schutte, A.E., Cuschieri, S., Mels, C.M.C., & Kruger, R. (2022). Blood pressure and its variability: Classic and novel measurement techniques.
Journal of Human Hypertension. - Musini, V.M., Gueyffier, F., Puil, L., Salzwedel, D.M., & Wright, J.M. (2009). Factors affecting blood pressure variability: Lessons learned from two systematic reviews of randomized controlled trials.
Current Hypertension Reports. - Centers for Disease Control and Prevention. (2023). Measuring your blood pressure.
CDC High Blood Pressure. - American Heart Association. (2023). Monitoring your blood pressure at home.
American Heart Association. - Kallioinen, N., Hill, A., Horswill, M.S., Ward, H.E., & Watson, M.O. (2017). Sources of inaccuracy in the measurement of adult patients’ resting blood pressure in clinical settings: A systematic review.
Journal of Hypertension.