Tenovi Cellular Blood Glucose Monitor
Need help with your Tenovi Cellular Blood Glucose Meter (BGM)? Find everything you need to know from set up to measurement best practices and troubleshooting. We’ve got you covered.
Jump To SectionTop Tips for Successful Measurement
Proper Usage
Wash your hands thoroughly and make sure they are dry before taking measurement.
Understanding Your Glucometer
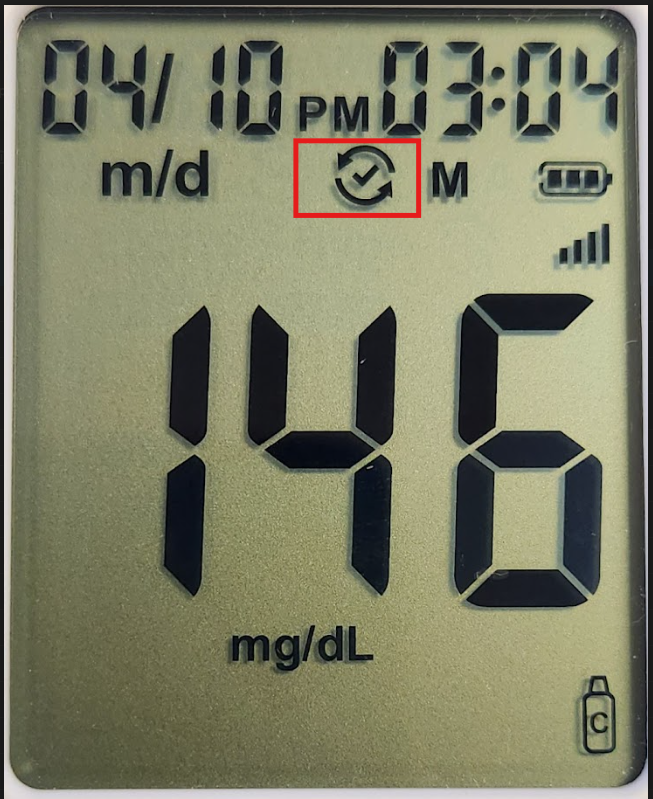
Pressing the button or inserting a test strip will turn on the glucometer. While the device is on, it will attempt to connect to the cellular network in the background. Your measurement will automatically be transmitted to your care provider at the end of the measurement. Keep the test strip in the device until the device shows a checkmark inside a circle. This indicates that your measurement was successfully sent. If you see an “X” inside the circle instead, please move close to a window, or somewhere that you receive good cellular signal, and take another measurement.
Power Your Glucometer
This glucometer is powered by an internal power source. This means there are not replaceable batteries. This device comes with a USB cable to charge your glucometer. If the display screen does not come on after inserting a test strip or pushing the button, please use this cable to charge your glucometer as soon as possible. Please do not use any other cable to charge your glucometer because doing this may cause irreparable damage to the device.
Setup & Use Steps


Device Specifics
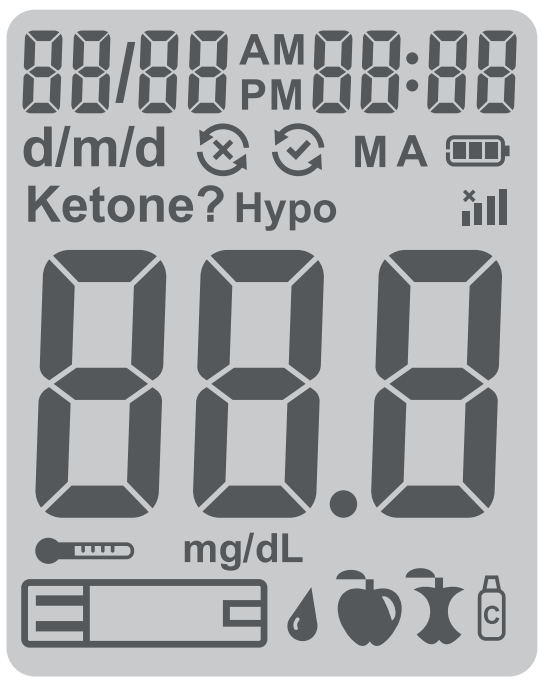
Device Icons

Storage Events
The Tenovi Cellular Blood Glucose Monitor can store up to 500 historical measurements on the device. If you take more than 500 readings, the first measurement you took will be erased as you take new measurements. You are able to cycle through previous measurements on the device itself by clicking the button once to turn on the device, and each additional button presses will cycle through the memory. You will see the letter “M” on the screen if you are viewing a saved measurement. After viewing the last measurement on the device, the screen will display “End” to indicate there are no more measurements to view. After the device connects to the cellular network, all saved measurements will be transmitted, if they previously failed.
Maintenance
Recharging the Battery
- When the meter needs to be recharged, the error code “E 11” will
appear. - When the Empty Battery symbol appears by itself on the screen, the meter
cannot be used. You must recharge the battery before using your meter.
The meter battery may be charged using one of the following options:
• USB Type A cable (computer charging)
• USB Type A cable with the AC adapter (wall charging)
Cleaning
Cleaning Your Meter
Step 1: Take one piece of Clorox™ Healthcare Bleach Germicidal Wipes (EPA Registration No. 67619-12) from the container.
Step 2: Clean the entire meter surface including front side, back side, right side and left side.
- The meter should be cleaned whenever they are visibly dirty or a minimum of once per week. This pre-cleaning is to prepare the meter surface for a disinfection process.
Disinfecting Your Meter
Step 1: After cleaning your meter, take out another new piece of Clorox™ Healthcare Bleach Germicidal Wipes.
Step 2: Wipe the entire surface including front side, back side, right side and left side of the meter, by a back and forth movement.
Step 3: Keep the meter surface wet for at least one minute.
Step 4: Wait for the surface of meter to be dry.
Device Reissue
- Blood Glucose Meters cannot be reissued as they come into contact with bodily fluids or medication.
When Taking a Measurement
Before You Measure
- Wash your hands with soap and warm water to increase circulation. Dry thoroughly, as residual moisture can skew results.
- Consistency matters when tracking trends. Try to test at the same time each day and use the same general area, such as the sides of your fingertips.
- Cold hands can restrict blood flow to your fingertips. If you have trouble getting enough blood on the test strip, try warming up your hands before washing them.
Taking Your Glucose Reading
- Lancets and Test Strips are SINGLE-USE ONLY. Discard your lancet after each use.
- Don’t squeeze too hard as excessive squeezing can dilute your sample with interstitial fluid, which may affect accuracy.
- Ideal fasting blood glucose levels for most adults are 80–130 mg/dL before meals, and under 180 mg/dL after meals (2 hours).
- Always store strips in a dry place and close the vial immediately after use.
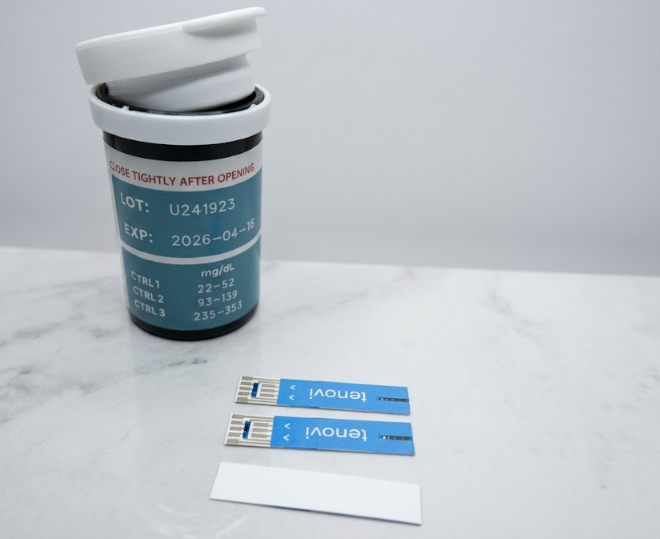
- If your results seem off, test with the manufacturer’s control solution to verify the device is working properly. The control solution test range can be found on the container of test strips.
Check Accuracy of Your Glucometer
- In order to ensure your glucometer is providing the most accurate results, you may use the control solution to confirm accuracy.
- On the label of your control solution, it will state whether it is control solution type 1 or 2.
- Check the test strip bottle for the expected range for your control solution. This is not located on the control solution bottle but on the container that has your test strips.
- If the glucose reading is outside of this range, please contact support.
Error Codes
E 1
Blood or control solution was applied to the test strip before the "flashing blood drop" symbol appeared on the display.
Discard the test strip and repeat the test with a new test strip. Wait until you see the flashing blood drop on the display before testing.
E 2
The meter is sensing a used or contaminated test strip.
Discard the test strip and repeat the test with a new test strip. Wait until you see the flashing blood drop on the display before testing.
E 3
Incorrect test strip.
Discard the test strip and repeat the test with a new test strip. Make sure that you are using a Tenovi Cellular Glucometer test strip.
E 4
Incorrect sample.
Discard the test strip and repeat the test with a new test strip. Make sure that only human capillary blood and Tenovi Cellular Glucometer control solution are used for the test.
E 5
Temperature out of range.
Move to an area that is within the operating range for the meter. Let the meter adjust to this temperature for 20 minutes before performing a test.
E 6 or E 7
Potential software or hardware issue.
Restart the meter. If the problem continues, contact Gluco Customer Support at 970-840-8297 (Monday-Friday 9 a.m.-8 p.m. Eastern Time). Please contact your health care professional if you need help.
E 8
A test strip was inserted while the meter was connected to a computer or wall outlet.
When the charge is completed (about 2 hours when charging an empty battery), remove the USB Type C cable from the meter, and then take a test.
E 10
Insufficient sample.
Repeat the test and apply enough sample to fill the test strip check window.
E 11
The glucometer has low battery.
Charge your glucometer as soon as possible. Connect your glucometer to the USB cable and plug the cable into a USB power adapter to charge your device.

Data was not transmitted.
Your glucometer is not receiving a strong enough cellular signal. Move closer to a window or somewhere your cellphone receives a good cellular signal, and retake your measurement.

No cellular signal found
If you see this symbol, there is an issue with the glucometer's cellular service. Contact Tenovi Support as soon as possible.
HI
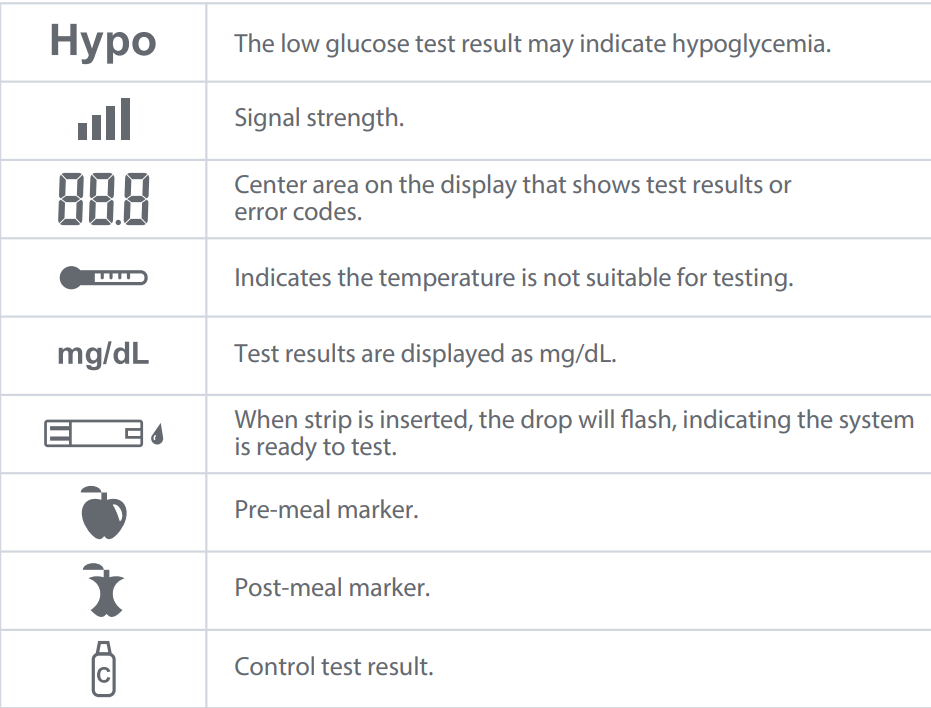
The test result is above 600 mg/dL.
Wash and dry your hands well and the test site. Repeat the test using a new test strip. If your result still flashes "HI", contact your health care professional as soon as possible.
L0
The test result is below 20 mg/dL.
Repeat the test using a new test strip. If your result still flashes "L0", contact your health care professional as soon as possible.
Measurements not showing on Tenovi Web App:
- Make sure your glucometer displays a checkmark in a circle symbol before removing the test strip. If the test strip is removed before this symbol appears, the reading may not be transmitted, but will be stored in the device memory. When the device is powered on again, the device will retry to send any stored readings that have not been sent.