Clear blood pressure monitor instructions are the difference between a reading a care team can trust and one it has to throw out. The Tenovi Blood Pressure Monitor Gen 3 is built to make that easy. It is an FDA-cleared home monitor that takes a reading at the press of one button and sends it to the care team automatically through the Tenovi Gateway.
This guide walks through the full process for the Tenovi BPM Gen 3, from first-time setup to cuff placement, taking a measurement, reading the device buttons, and clearing common errors. It is written for care teams onboarding patients and for patients using the device at home. For a quick visual, the cuff placement video shows correct positioning in under a minute.
What the Tenovi BPM Gen 3 Is
The Tenovi Blood Pressure Monitor Gen 3 is a cellular-connected home blood pressure monitor used in remote patient monitoring (RPM) programs. The patient measures at home, and each reading transmits to the care team without an app, Bluetooth pairing, or home Wi-Fi.
The device pairs three things that matter for accurate home monitoring. It has a large LCD screen that shows systolic pressure, diastolic pressure, and pulse. It has a voice function that reads the result aloud, which helps patients who cannot see the display well. It has a premium cuff in three sizes, so it fits a wide range of arm sizes.
Accuracy is within +/- 3 mmHg for blood pressure and +/- 5% for pulse. The device measures systolic pressure from 60 to 260 mmHg, diastolic from 40 to 220 mmHg, and pulse from 40 to 199 beats per minute. It runs on four AA batteries and needs no charging.
Blood Pressure Monitor Instructions: Setup
Setup takes a few minutes and follows four steps. Do them in order the first time the patient uses the device.
Step 1: Power the Gateway
Plug in the Tenovi Gateway. The light flashes purple while it connects to a cell tower, which can take up to 10 minutes. When it connects, the light turns solid red. A red light means the Gateway is ready for the day’s reading.
If the light turns blue, the Gateway cannot find a signal. Move it to an outlet closer to a window or a spot with better cellular reception.
Step 2: Pull the Battery Tab
The monitor arrives with batteries already installed. A plastic guard sits in the battery door to keep them from draining in transit. Pull the tab out, and the batteries power the device.
Step 3: Put On the Cuff
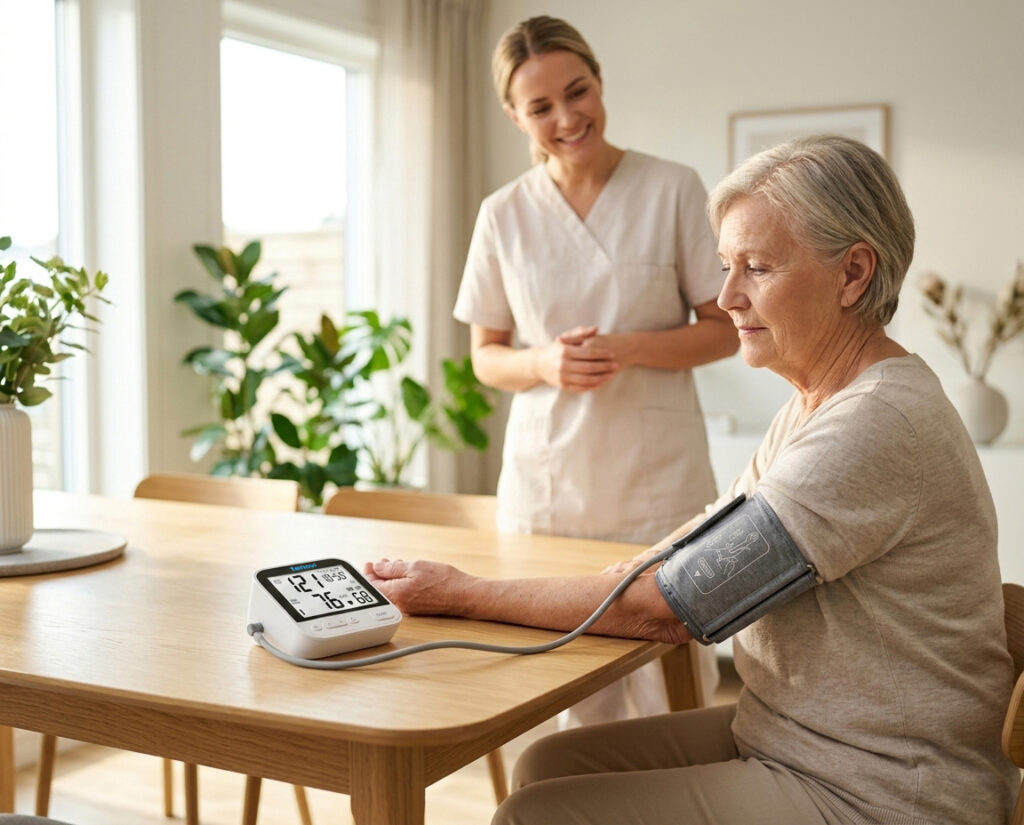
Position the cuff on the bare skin of the upper left arm, above the elbow. Wrap the velcro so the edges of the cuff line up with minimal overhang. Tighten it until one finger fits between the cuff and the arm. A snug cuff is important, since a loose cuff will not inflate properly.
The hose should come out the bottom of the cuff by the elbow. Rest the arm on a table, palm facing up.
Step 4: Press Start
Confirm the hose connector is pushed all the way into the monitor. Press the Start/Stop button to begin. The cuff inflates, measures, and shows the reading. The Gateway beeps and flashes green when the reading transmits.
How to Take an Accurate Reading
Blood pressure rises and falls throughout the day. Swings of up to 20 mmHg are normal, and stress, caffeine, movement, talking, or a full bladder can all push a reading higher. A short routine keeps readings consistent.
Before You Measure
Set up the body position first. Sit upright in a chair with the back supported. Keep both feet flat on the floor and legs uncrossed. Rest the arm on a flat surface at heart level. Put the cuff on bare skin with the tube facing down, never over clothing. Stay silent and still through the measurement.
Taking the Measurement
Measure at the same time each day if tracking blood pressure over time. Take two readings one minute apart and record both. If the two differ, average them. Share the readings with the healthcare provider.
If one reading looks unusually high or low, wait a few minutes, relax, and try again. Blood pressure is best judged on patterns and averages over time, not a single number. If a reading is high and stays high, contact the healthcare provider.
Understanding the Device Buttons
The Tenovi BPM Gen 3 has four controls. Knowing what each does makes the device faster to use.
The Start/Stop button begins or ends a single measurement. The Mute button turns the voice operator on or off, so a patient can silence the spoken reading in a shared space or turn it back on when it helps. The 3 MEAS button takes three back-to-back measurements and displays the average. The scroll buttons cycle through the stored average and past measurements.
Two on-screen labels are worth knowing. An “AVG.” label means the screen is showing the average of the last three readings, which is never sent to the Gateway. A “3 MEAS” label means the reading came from triple measurement mode, and that average is the value sent to the care team.
Choosing the Right Cuff Size
Cuff size drives accuracy more than almost anything else in home monitoring. A cuff that is too small or too large distorts the reading. The Tenovi BPM Gen 3 comes in three sizes: Extra Small for a 15 to 28 cm arm, Wide Range for 22 to 42 cm, and Extra Large for 32 to 52 cm.
The most reliable way to size a cuff is to measure the arm. Use a flexible tape or a string and ruler to measure the circumference of the upper arm at the midpoint between shoulder and elbow. Pick the cuff where that measurement falls in the middle of the size’s range, not at the very edge.
When arm measurement is not possible, body mass index can give a rough starting estimate. Because BMI does not account for muscle or bone, two patients with the same BMI can have different arm sizes, so direct measurement is always the better choice.
Clearing Common Errors
The device shows a short code when a reading fails. Most codes point to a fixable positioning or cuff problem.
Er 1 means the sensor detected high starting pressure, usually from starting a new measurement before the cuff fully deflated. Wait for the cuff to deflate, and if needed, disconnect the hose to let air escape, then reconnect and measure again.
Er 2 means a weak pulse signal. Remove long sleeves so the cuff sits on bare skin, and confirm it is secured tightly on the upper arm.
Er 3 means the result was outside the measurable range, often from improper technique. Stay quiet with feet flat and measure again.
Er 4 means the cuff is loose or leaking air. Refasten it and push the hose connector all the way in.
Er 5 means the air tube is twisted or the cuff is too tight. Unravel the tube and refasten so one finger fits between cuff and arm.
Er 6 means the device detected motion or talking. Hold still, stay silent, and measure again.
Er 7 means cuff pressure passed the safety limit set by international device standards. It does not mean the patient’s blood pressure is dangerously high. The cuff may be too tight or too small.
If the screen shows no display at all, the batteries are drained or seated wrong. Replace them and check the polarity. If the device looks frozen or stays on more than five minutes, pull the batteries and reinsert them. That turns the device off without erasing saved measurements. There is no separate reset.
How Readings Reach the Care Team
The Tenovi BPM Gen 3 connects to the Tenovi Gateway automatically out of the box, with no pairing step. After a measurement, the Gateway light turns yellow while the reading transmits, then flashes green when it succeeds and stays green for the rest of the day. It returns to red at midnight as a reminder to measure again.
The device stores up to 200 readings on board. If a patient travels away from the Gateway, the monitor holds those readings and sends them once it is back in range. Past 200, the oldest reading drops off as new ones come in.
If a reading does not transmit and no error shows, power cycle the Gateway and confirm it shows a solid red or green light. Retake the measurement with the monitor close to the Gateway. If it still does not send, contact Tenovi support.
Frequently Asked Questions
1) How do I set up the Tenovi blood pressure monitor?
Plug in the Gateway and wait for a solid red light. Pull the plastic tab from the battery door to power the monitor. Put the cuff on the bare upper left arm, snug enough for one finger to fit underneath. Press Start/Stop to take the first reading.
2) Which arm should the blood pressure cuff go on?
Use the left arm, on bare skin, not over clothing. Position the cuff above the elbow with the hose running down the inside of the arm toward the palm. Rest the arm on a table at heart level.
3) Can I turn off the voice on the Tenovi BPM Gen 3?
Yes. Press the Mute button to turn the voice operator on or off. That lets a patient silence the spoken reading in a shared space and turn it back on when the audio helps.
4) What do the error codes on my blood pressure monitor mean?
Each code points to a specific fix. Er 1 is high starting pressure, Er 2 is a weak pulse signal, Er 4 is a loose cuff, Er 5 is a twisted tube, and Er 6 is motion or talking. Most clear by refastening the cuff, staying still, and measuring again.
5) Why is my reading not sending to the Gateway?
Power cycle the Gateway and confirm a solid red or green light. Take the reading again with the monitor as close to the Gateway as possible. If it still does not transmit, contact Tenovi support.
6) How do I pick the right cuff size?
Measure the upper arm circumference at the midpoint between shoulder and elbow. Choose Extra Small for 15 to 28 cm, Wide Range for 22 to 42 cm, or Extra Large for 32 to 52 cm, picking the size where the arm falls in the middle of the range.
Understanding Blood Pressure Monitor Instructions
Good blood pressure monitor instructions come down to a few habits: connect the Gateway and wait for a red light, size and place the cuff on the bare left arm, sit still and quiet at heart level, and take two readings a minute apart. The Tenovi BPM Gen 3 handles the rest, sending each reading to the care team automatically and storing up to 200 when the patient is away from the Gateway. Error codes point to simple cuff and positioning fixes, and the Mute button lets a patient use or silence the voice readout as they prefer. For full detail, the BPM Gen 3 support page holds the quick start guide, user manual, and placement video.
Tenovi provides cellular-connected remote patient monitoring and remote therapeutic monitoring (RTM) infrastructure for care-services companies, providers, and health systems. Our devices transmit patient readings to your care team automatically through the Tenovi Gateway, with no app, Bluetooth pairing, or home Wi-Fi required. To see how the Tenovi BPM Gen 3 fits your program, request a free demo and consultation.